A few people were asking about how I inked and printed a new print that I’ve started, so I’m posting a quick description of my newest “jig-thingie”. I know it’s unusual, but it REALLY helps!
Please note the intro tune is from Wheel. of. Fortune! 🙂
Transcription
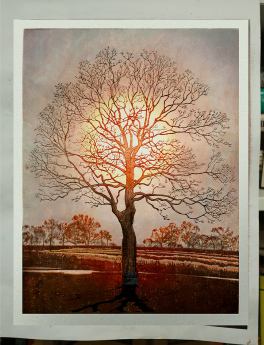
John: So normally where I print is this traditional bench I made about 20 years ago where I sit down at it and I really enjoy using it, but for this print I’m making, I had to create a jig because of this circular fade or bokashi. So what I came up with is th
There are 8 circular bokashis: yellow, red, and blue in the background; red and brown on the tree keyblock; red and brown in the tree; redish on the background trees…
is rotating or say, lazy Susan-style jig. And when I go over a couple of features that I find interesting, I hope you do too.
So here we have this block and I’ve got it so that it is secured by these wedges and a pretty good job. And then I got this lock here and that will keep it from rotating– if I don’t want it to. But right now, I do want it to rotate because I’m going to add some bright orange in the middle to this. So. I’m eyeballing this on this particular impression here, because accuracy isn’t quite as important as, say, the background was earlier. But, you know, I can wipe things, I can ink things in a circular motion. If I when I get to the point of wanting to print, I’d then lock it up like this and go and get some paper and…
You can see the bokashi fade here. The really wide one that I’ve been doing right now, which is proved to be a challenge, but this thing is really helping a lot. So I fit it in the kentos and I’m able to print standing and I’ve kind of been enjoying printing on the standing up. You get a good amount of leverage. I’ve never done this before, but I know a lot of people do. All right. So let’s look and see what this guy looks like. So that’s the circular impression of the tree. This isn’t exactly final, but you get this idea of what it’s supposed to look like eventually. Now, when I’m doing the outer area, the background, it requires a lot more accuracy and I want to make sure everything looks very consistent. And so this arm really helps with that. I have listed where these colors start and end. Some of them overlap with each other, but that way, I can hold a brush and spin this thing around. You get more or less a pretty consistent edition for all these three really large bokashis here. So anyway, I hope you like my gizmo and thanks for watching!
Earlier this month, Tanuki’s print “Cole Mountain, VA” was awarded the Minoru Fujimori Prize for the 5th Annual AIMPE ’21 Exhibition held in The Hall Awa Japanese Handmade Paper, Yoshinogawa City, Japan. Over 2,000 prints throughout the world were considered.. The prize carries an additional award of 30,000 yen.
Thank you, Awagami Washi and the Fujimori Family!
The Fujimori Prize is dedicated to 6th generation, Minoru Fujimori who took over the family business in 1945 determined to continue washi papermaking despite post-WWII difficulties. In 1970, Minoru-san was designated as an ‘Intangible Cultural Property of Tokushima’ in recognition of his skills. In 1976, Awagami washi was designated as a ‘Traditional Craft Industry’ and in 1986, Minoru Fujimori was further honored as Master Craftsman and awarded the ‘Sixth Class Order of Merit, Sacred Treasure’ by the Emperor. Currently his son, Yoichi and family continue the papermaking tradition as their ancestors did before them. In an effort to preserve the craft and pass washi papermaking onto the next generation, the family has established a network of international partners that offer Awagami papers to worldwide artists.
Additional images (in order): Minoru Fujimori, Awa Hall of Papermaking, “Cole Mt., VA”
Over the last 4 months, I’ve been able to steal a few minutes here and there between teaching during Covid (0% fun BTW) to work on my Appalachian Print Collection project.
A pic of Halle who came to see John’s band, The Hobohemians at Athfest- Athens, GAs largest and perhaps hottest music festival.
Things are brewing behind the scenes– here is some recent (and much appreciated) news!:
(1) Tanuki Prints now has an assistant, Halle Castille, who is handling much of the social media coordination and is also essential in both binding books and kicking John in the rear-end when he needs it!
(2) The A.T. prints are to be featured in winter issue of “Journeys“– The Appalachian Trail Conservancy’s magazine. I’m looking forward to reaching dedicated hikers and supporters while giving back to the organization.
(3) I am also involved with a project that I can’t wait to tell the world– however, it will just have to wait. Yes, I am “dangling”, but all will be revealed soon. Let’s just say that I can’t imagine having a more meaningful honor from the national hiking community.
(4) Tanuki Prints will join the ranks of many of my Japanese woodblock friends when I am interviewed by “The Unfinished Print“ podcast later this month- I’ll send a link as soon as the pod is ripe.
Gainesville artist crafting epic collection of Appalachian Trail Art
John Amoss, pictured May 28, 2019, in his home in Gainesville. Amoss traveled two times to Japan to learn his style of printing, which is similar to the famous print ‘The Great Wave’ by Katsushika Hokusai. – photo by Nick Bowman
John Amoss puts in more work before the sun rises than many do while the sun is high in the sky.
For the past 18 months, his day has often started around 2 a.m. with the march into his basement studio — trying almost obsessively to complete a project that has roots in his boyhood adventure and a unique Japanese artform.
John Amoss talks about the process of wood block print making on Tuesday, May 28, 2019, at his home in Gainesville. Amoss, an artist and teacher at the University of North Georgia, owns Tanuki Prints, a print-making business based on the Japanese ukiyo-e period. Using this method, he’s making by hand several volumes of prints based on his hike of the Appalachian Trail as a 17-year-old. – photo by Nick Bowman
Japanese art and the Appalachian Trail don’t often find themselves in the same conversation. But each day, coffee in hand, he makes the journey to his studio in Gainesville to work on his woodblock printings of 14 scenes from the famous trail — a marriage of Western scenery and Eastern art that may be the first of its kind.
“I’m just enthralled with this stuff,” Amoss said while sifting through prints of his favorite woodblock artists.
Outfitted in a floral, short-sleeved button-down shirt, oversized khaki pants, no shoes and an ink-stained apron, Amoss climbs behind his lamp-lighted work desk each day and settles in.
Prints based on John Amoss’ hike of the Appalachian Trail sit in his home office. Photo courtesy of John Amoss.
The lights are low and a mix of music is playing behind him as he prepares to take on what he calls “The Appalachian Trail Print Collection.”When his project is finished, three years will have passed and Amoss will have completed a book of illustrations from 14 scenes in states along the trail that — from the ink to the wood blocks and even the tools themselves — is almost entirely made by hand.
Photo courtesy of John Amoss
While hiking the Appalachian Trail as a 17-year-old in 1980, Amoss snapped photos along the way, preserving scenes on Kodak film.To celebrate the 40th anniversary of his trip, and to help himself and others relive their journeys along the trail, he set out to combine the hard work of hiking with the hard work of woodblock printing.
“It’s kind of interesting, because it ties in a little with the Appalachian Trail, too, because everything I’ve ever done that’s worth a damn, I didn’t know what I was doing,” Amoss said. “Had I known, I probably wouldn’t have started. So, ignorance is strength in a way.”
Woodblock printing takes a certain strength of its own. Dedication, concentration and a good bit of muscle make the art what it is. That’s also what makes it so valuable.
Unlike Kodak’s Ektachrome film in Amoss’ camera while on the trail — with colors dedicated to film with a snap of a shutter — each woodblock print is the result of hours of work in carving, coloring, printing and drying stages that must be repeated for just about every color on every print.
“I have some of these prints that have eight colors on top of each other,” Amoss said. “I find that to just be mind-blowingly fascinating. Most people, I think, would rather just tear their hair out.”
After climbing behind his desk with the block, he sprays water to dampen it so the pigment, which is a powder mixed with water and serves as the ink, prints properly. Then he dabs a little rice water onto the block, which helps the pigment transfer from the block to paper, which is dabbed in a few places next, not be absorbed by the wood. Then he brushes the rice water and pigment all over the piece of wood with a printing brush that’s not too coarse and not too soft.
He lines up a piece of mulberry paper, which has to be precisely placed with each print, and begins to rub it with a baren, a special printing pad. By pressing the paper to the block, he transfers the pigment to the paper to create a piece of his final scene.
John Amoss presses paper against an inked wood block using a tool called a baren on Tuesday, May 28, 2019, at his home in Gainesville. Just about every bit of Amoss’ print-making process is done by hand, from making the inks and pigment from dirt to the tools he uses on the bench. – photo by Nick Bowman
“The next step is to use the same sheets, different block, different color pigment and it begins to build layers until the product is finished,” Amoss said.
He is making 100 full books, which means there will be 1,400 individual prints. Each one of those prints take about 12 colors, meaning Amoss will go through the process about 16,800 times. He’s almost halfway through the project and plans to have it done by September 2020.
The full books will cost $750. He’s also selling 100 versions that will include just the first and last scenes for $150.
“It’s a ton of work, but it’s fun,” Amoss said. “And the nice thing about that is that it kind of filters a lot of people out that they don’t want to go through the trouble. And the folks that do know about this, they’re willing to pay because they know how much work it is and how rare this kind of stuff is.”
Carving tools sit on a desk in John Amoss’ home on Tuesday, May 28, 2019. Amoss makes prints using a Japanese wood block method, where reliefs are carved into wood, which is then covered in ink and used as a template to make an image. – photo by Nick Bowman
Years ago, while living in Atlanta, Amoss was in a book store and picked up “The Complete Woodblock Prints of Yoshida Hiroshi.” Amazed at the works inside the book, the artist wanted to learn how to do it himself.
“I love the mystery of it,” Amoss said. “I love the exoticism of it and the history … other people inspired me and I want to inspire other folks that want to do this. It just takes a really, really long time.”
His expertise has come after years of work and investment. He’s traveled to Japan more than once to learn from printmakers.
While flipping through the pages of Hiroshi Yoshida’s book, he said he “found the atmosphere in some of the prints to be fantastic.” He remembers thinking, “Every one of these things is just enchanting.”
“I’m a very, very curious person,” said Amoss, who’s also a printmaking professor at The University of North Georgia’s Gainesville campus. “If I’ve got some kind of juice or energy about something, I want to go to the source of it.”
His students feel that same passion while Amoss is teaching them. Magnum Brock, a junior studio art major at North Georgia, described Amoss as an “eclectic philosopher.”
“He really tries to take time and ensure that the deeper meanings and the deeper parts of the craft are really portrayed to you rather than just the result,” Brock said. “He really emphasizes the journey of art, which is something that I think really resonates with a lot of other students.”
Amoss even makes his own pigment, sometimes using dirt or clay to give color to the inks that he uses in his printing. – photo by Nick Bowman
Brock has taken two drawing classes and is about to take his third printmaking class with Amoss.
“He is that professor that you go to college to learn from,” Brock said. “He’s the professor you want when you go to college even if you don’t know it.”
Though the project is a lofty goal, Halle Castille, another one of Amoss’ students, said that’s just the type of person Amoss is.
“It doesn’t surprise me,” said Castille, a senior studio art major. “I know that he thinks this could be his defining moment as an artist, and as artists we all are searching for that one goal, so I’m glad that he’s found what he’s passionate about.
“I know that this will definitely be that moment for him.”
When Amoss first saw those prints in the book that now sits on his shelf in the basement, he had no idea he’d be doing what he is today. Once he started practicing woodblock printing, though, he knew he couldn’t let it go.
“I just knew I was hooked and it was going to take me 20 or 30 years to get good at it,” Amoss said.
Watch John Amoss demonstrate woodblock printing
By: Layne Saliba
During those years, he continued his life. He worked as a package designer, then an illustrator for the Atlanta Journal-Constitution. He broke off from his day job and started his own illustration business, then went back to school to get his masters in printmaking so he could teach.
As he was learning, he reached out to others in the woodblock printing world. Calvin Carlisle lives in Cleveland, Ohio, and has never met Amoss in person. They’ve only talked through messages on Facebook and email — typical of artists buried in their basements and studios. That doesn’t mean Carlisle doesn’t see Amoss’ passion for the project, though.
“I think you chew on these ideas and you think to yourself, ‘This would be cool to do,’” Carlisle said. “There’s just some things you can’t let go of. There’s just some things you have a love and admiration for that you say, ‘Yeah, I could spend the next 1,000 hours doing this and I’m not going to get sick of it and I’m going to love it.’”
They bounce ideas off each other, both getting better at what they do each and every time they communicate. And they support each other, which is what Carlisle plans to do more of when Amoss’ project is complete.
“I’m going to buy one of his books,” Carlisle said. “It’s not cheap, but I think somebody like me who understands … I’m looking forward to him putting them on sale because I’ll be one of the first ones in line to get one.”
And that’s Amoss’ hope with the project. He hopes, in the end, people see the work behind it and appreciate it each time they look through the book. No matter where the book ends up — on a shelf or on a coffee table — he hopes it helps all those who purchase it relive their time on the trail.
“It’s going to last a lifetime, and if somebody has thru-hiked the whole Appalachian Trail, it’s a lot of effort, and it means a lot to them, so I want to honor that,” Amoss said.
John Amoss describes the print-making process on Tuesday, May 28, 2019, at his home in Gainesville. An art teacher and designer, Amoss is making by hand several bound volumes of Japanese-style prints based on his through-hike of the Appalachian Trail as a teenager. – photo by Nick Bowman
It’s been a crazy month for me: Spring Break (which was nice), then I blew out my shoulder from printing too much (I didn’t know I had rhomboid muscles… but after a week of intense pain, I sure do NOW!), and had an unrelated surgery from which I am now recouping with the help of some rather heavy meds. So, Dear Reader, I trust that I remain coherent…
Anyway, enough of that. Around 1993, before I mustered the courage to make woodblock prints, I collected them. It was great to see the prints in a reference book, but looking at the real thing has taught me a lot about color and printing techniques. As most of you know, woodblock prints are even more beautiful in the hand, the richness of the colors, embossing, and the details really come alive.
I believe these prints are first editions ranging from 1836 to 2003 and cover ukiyo-e > shin hanga > sosaku hanga movements > the modern day. It’s admittedly heavy with Hiroshi Yoshida who’s “My Main Man”. Don’t worry, Hasui- you’re cool too…
You KNOW dank memes are dead if Tanuki is using ’em.
So this is March’s entry. I hope the next article will have a bit more content- but until then, I do hope you enjoy the selection below.
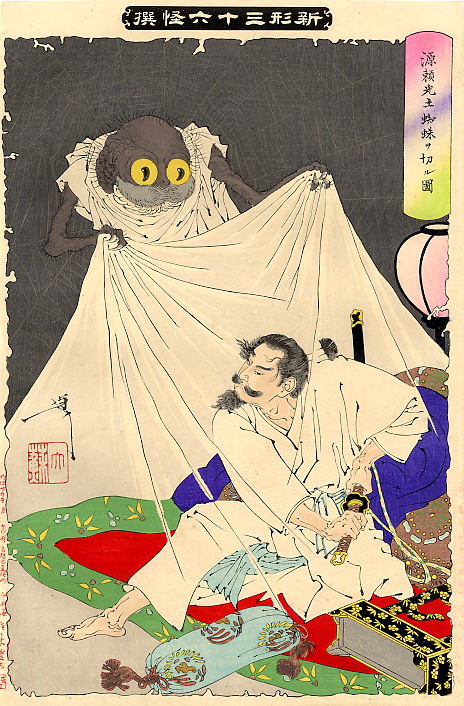
ABOVE: Kawase Hasui, “Benten Shrine”, 1929 oban. I remember walking here south of Ueno Park.ABOVE: Utagawa Kunisada “若菜姫 and 鳥山秋作 (Toriyama Akisaku and Princess Wakana)”, 1853 both oban. I was told that this looks like a typical marraige.ABOVE: Tsukioka Yoshitoshi, “Rainy moon – Kojima Takanori”, from the series One hundred Aspects of the Moon, 1889 oban. The wiped moon is really well done.ABOVE: Published by Isetatsu “Cat School”, Yanaka, Tokyo oban. Research told me that this was wrapping paper???ABOVE: Katsushika Hokusai “Mikiri no Fuji” from One Hundred Views of Mount Fuji (Fugaku hyakkei),1834 chuban. Hokusai was a genius depicting Fuji in a myriad of ways.ABOVE: Katsuyuki Nishijima, “Fuzuki: Tea House in July” 1998 ogata-chuban. We purchased this in Kyoto in 2002.ABOVE: Tsukioka Yoshitoshi, “Minamoto no Yorimitsu Attacking a Ground Spider” from the Thirty-six Ghosts series, 1889-1892 oban. Yoshitoshi was said to be a murderer and was locked up in an insane asylum.ABOVE: Hiroshi Yoshida, “Glipse of Ueno Park”, 1937 oban. This print required the most impressions of any of Hiroshi’s prints- a total of 100 colors!ABOVE: Hiroshi Yoshida, “Court of the Lions, Alhambra”, 1928 or 1955 koban. An exquisite print from Ben Blakeney’s memorial book.ABOVE: Hiroshi Yoshida, “Kameido Bridge”, 1927 oban. Horizontal baren suji in the water is a really nice touch.ABOVE: Hiroshi Yoshida, “Plum Gateway”, 1935 oban. Love the subdued colors.ABOVE: Hiroshi Yoshida, “In a Temple Yard”, 1935 oban. Anyone else find the proportions a bit strange?ABOVE: Hiroshi Yoshida, “Himeji Castle”, 1928 oban. Evening version.ABOVE: Toshi Yoshida, “Pagoda in Kyoto”, 1942 chuban. Delicate sky.ABOVE: Toshi Yoshida, “Pine of the Friendly Garden” 1980 naga-ban. There is actually a third print missing for my set.ABOVE: Toshi Yoshida, “Bamboo of the Friendly Garden” 1980 naga-ban. I think that there is a missing plum tree to the right.ABOVE: Toshi Yoshida, “Myoko Hot Spring” 1955 oban. The orange sky really works IMO.ABOVE: Kawase Hasui, “Lake Kugushi”, 1920 oban. From the from the series “Souvenirs of Travel”- a REALLY rare pre-Kanto earthquake print.ABOVE: Katsuyuki Nishijima, “Asahi (the Morning Sun)”, 1999 slightly over-sized oban. I love the highlighted clouds.ABOVE: Shoson (Kozon), “Wild Geese”, 1926 oban.ABOVE: Tsukioka Yoshitoshi, “Ishiyama Moon”, 1889 oban. Another from his 100 Moons series.ABOVE: Kiyoshi Saito, “Temple Gate”, 1955 oban. A lotta gomazuri.ABOVE: Paul Binnie, “Torii at Miyajima” 2003 slightly over-sized oban. I got this print from Paul himself- nice guy!ABOVE: Gekko, “Calligraphy Performance at Flower Mountain”, 1897 oban. My wife is a calligrapher, so it hangs near her desk.ABOVE: Kiyotada Torii, “Uwanari” From Kabuki’s 18 Famous Plays, 1896 oban. I like the scary hannya above and the fearless-looking guy below.
Oh, and in case you were wondering- here’s a listing of Japanese woodblock print sizes:
1. blocks 2. water and misc. brushes 3.printing brushes (maru bake) 4. pigment storage 5. more blocks 6. pigment pots 7. barens 8. carving tools 9. bamboo skins takenokawa. Not shown: sharkskin, washi, print drying press
I have very limited space to print as you can see. It’s doubles as my office at the university and is a mess most of the time. I hope that someday soon, I can locate to a studio where I am not falling over stuff- or stuff falling on top of me.
As you can see, I have pretty much all I need except space and time… I am presently building a forced-air print drying press (from a conversation I had in Hawaii with the gracious Paul Binnie)- details to come on that [UPDATE: here is the print dryer post]…
I had the pleasure of spending a month working at Mokuhankan Studio in Asakusa, Tokyo from May to June, 2017. One of many new experiences for me was, under the direction of Natsuki Suga (who worked under Kenichi Kubota at the Adachi Institute for 5 years) to make relatively large batches of color using wood board mortars and pestles. This is to assure the pigments’ quality and to create a well-mixed supply of color paste that is ready to use later. Each color requires it’s own sanded cherry board and pestle (pine with cherry faced using epoxy glue) that was made by Lee-san.
Cherry blocks made by Lee-san to be used as a pigment griding ‘mortar and pestle’.
Like most printers, I generally use a mortar and pestle for a far too short of a time in order to grind pigments into a paste [for beginning printers, this resulting color paste is then later added by the printer to the block with varying degrees of water and nori (starch) paste while printing]. For the record, I’m pretty slack and sometimes just mix the pigment out of the bag with water (sometimes w /alcohol to break the surface tension) using only a brush/tokibo or hakobi. I am learning that mixing the colors thoroughly helps create much smoother colors and avoids a print being spoiled because of stain blotches which sometimes show up during printing from not mixing the pigments well enough.
“Warning: It takes a long time.”
This process of grinding on a board takes a long time but, unlike using a deep mortar, you can much more easily see the texture of the pigment on the flat surface.
List of colors:
Prep: Of the 5 colors, only bengara had pure ethyl (grain) alcohol added, mixed in the night before, and was allowed to sit open for the alcohol to evaporate. Also, pigments like bengara require more time to grind because the particles are coarser. You will need a wooden board, wooden pestle, a scraper (my credit card seemed to work well since it was not hard enough to damage the wood), water, jars.
(1) Wearing a mask, add a small amount of clear (preferably distilled) water to the dry pigments in a jar and stir.
(2) Approx. one tablespoon of damp pigment is then placed onto the top of the block.
(3) The wooden pestle is held at a slight angle away from the pigment to be ground and pushed with moderate pressure back and forth.
4) The processed portion naturally accumulates and builds up on the pestle which is then scraped off.
(5) Water is occasionally added, but Suga-san explained that too much water doesn’t allow the particles to grind against each other.
(6) After each pass, the color is then pushed back and the process is started over.
(7) The idea is to grind 4>6 times into a paste (refer to chart above it took on the average 45min. to process a tablespoon of dampened pigment). Suga-san said that the final surface should appear creamy-smooth.
(8) At the end of the grinding process, water is spread around and the residual pigment is gathered up.
(9) After grinding, enough water is added to the paste to be pushed through a fine sieve into jars.
(10) Water is then very carefully added to the top. Over time, the water and heavier pigment naturally separate.and stored out of the light in a cool area of the studio.
(11) Each morning, the water is drained carefully off the top. New water is then carefully added again to the top of the drained paste after it’s used and returned to a cool, dark area. This process or replacing the water reportedly keeps spoilage down (presumably, by limiting exposure to air) as opposed to adding preservatives. The key is or course, not to shake or stir the jars.
Additional references: Preparing powdered pigments can be found in a “Tools and Materials” section David Bull’s www.woodblock.com Encyclopedia article. The idea of keeping a selection of pigments stored in ‘paste’ form in an alcohol/water mix is discussed in ‘One-Point Lesson’ #6 in another section of the Encyclopedia.
NOTES AND OBSERVATIONS:
Mokuhankan is planning to compare this traditional method of grinding pigments with using a western-style glass muller/ glass slab combination. I suspect that this will result in less hard-won pigment being lost and may go a bit faster.
As of several days later, both the Ultramarine and the Indigo did not separate to clear water. I was a little suprised at the Ultramarine since it is a mineral pigment.
I’m also not quite sure that the step of pushing the pigment through the sieve is necessary since the ground particles are much finer than the screen.
After printing, mixing bowls are left to dry around the printing desks and are reconstituted (unless starch paste had been added) by simply adding a little water and stirring with the tokibo without apparent problems. I’ve noticed that this reconstituting doesn’t work as well with commercial tube watercolors since there is gum added and it results in a grainy texture.
A Comparison of Learning Environments: Academia and the Apprenticeship Models
Watanabe Publishing c. 1935
I personally feel very fortunate in many ways: I have have a functional, supportive family and as a university professor, I am paid to learn, along with my teaching responsibilities. I have tried to not separate learning and teaching as much as possible.
A few opportunities came up for me via woodblock printmaking to consider my role: One was casual conversations with David Bull of Mokuhankan concerning the apprenticeship model and the other is an invitation to speak at IMC2017: the International Mokuhanga Conference in Honolulu, HI this late Sept. The subject that I chose for the conference relates to Environment and Social considerations of woodblock printmaking- certainly a broad subject with a lot of latitude. I would like to concentrate on active learning within work environments and how to incorporate elements of active learning within academia. There will be a diverse crowd: artists, craftsmen, academics, professionals, and amateurs. As a teacher and commercial artist with a diverse background, I feel that I am able to compare ways of learning which I have personally felt were the most valuable to me and my students.
A little printmaking background: Since the mid-90s, I have struggled (mainly on my own) to understand what variables equate making a strong and well-made print, both in design and execution.
If you have tried mokuhanga, you know what I mean: (1) everything seems prohibitively expensive, (2) a lot of things are hard or impossible to come by, and (3) you’re not sure of what’s right/wrong since there are very few reliable sources of direct information. Some, if not most of these challenges can’t be addressed by studying books or taking classes. I have learned enough of the art that I needed to go back to Japan to feel, smell, look, hear, and absorb the process and to work alongside others who have a more developed and varied experience. I really wasn’t conscience of what I needed, it just seemed like the natural progression of things. And I got a chance to do just that this summer. Beyond the technical issues, I also was able to rediscover and consider that…
“I find that, although I have learned a great deal as a student, I have valued work and outside of academia experiences every bit as much, if not more.”
Selected Glimpses of Learning
As I stated earlier, I worked for nearly 10 years at The Atlanta Journal-Constitution starting in 1987 and later as owner of Amoss Illustration, Inc. working with many national clients.
Prudential Quarterly cover illustration c.1998 A masthead illustration for the 1996 Olympic Editions of the AJC
During that period, I learned:
to carefully chose the questions to ask
to learn to teach myself
to watch, try, then ask
to be engaged
to be patient and open to listening to authority
to witness artwork being made
that ability was rewarded
Toshio Odate
Later, I took a week-long course in Japanese woodworking, which, to some degree exposed me to a taste of what it was like to work under a master, Toshio Odate.
I learned:
that, in a group, students quickly, and naturally formed a hierarchy based on skills and that there were several un-official teachers
that I had the choice to stay or leave
that the teacher only helped those students who tried all solutions first
that spaces are to be filled with action, rather than talk
that I was not very good at carpentry
Fellow printers at work- (clockwise FL>FR): me, Aiyumi-san, Suga-san, and Ishikawa-san
And to compare, I considered my experience this spring at Mokuhankan, print studio in Tokyo.
I learned that:
although I was a ‘competent’ printer, I was around printers who were obviously consistently better and I continuously re-defined what “quality” was
it was understood that all printers had to steadily improve or they were relegated to less interesting work
a print-shop is a team effort which allows for all to contribute
you are receptive to learn whatyou need whenyou need it
This begs the question:
As an educator in a public university, the question that I am posing is: How can I/we incorporate these “apprenticeship-like” modes of “deep learning” into practice?
Not to be a “downer” here, but there are many things in academia (non-technical schools) that seem to ‘conspire’ against doing so IMO:
Class length: You have them for 3 months or so and even if they take the next class in succession, such as Printmaking II, it could be a year or more since they’ve thought about the subject. Sometimes the 2.5 hours a class period is too long and too short
Grades: Especially in the beginning of college, students often care more about grades than learning- is this high school’s fault? parents? society? What many students are looking for is a “stamp of approval” aka a diploma (which should be important). At least in art, a good portfolio is key to getting anywhere.
Class schedule- me to students: OK, guys- first we study relief printmaking, then etching, then… Some students want to continue to stick with something longer because they see its potential instead of moving on. The rationale is, of course, that they can pick it up later in their academic career to pursue what they resonate with.
“Info-dumping”. Most students want the answers and if the instructor doesn’t give them all of it, then the student doesn’t feel as if they have received what they’ve paid for.
Of all the issues above, #4 seems to be the biggest deal for me. The problem of an “info dump” is that it’s artificial, consumer-based, and not very useful for anyone. I hate to say it, but the student must first find the problem in order to appreciate the answers. Art is, in my opinion, a REALLY good place to apply an active learning process based on information given within the context of need, rather than simply laying out information.
To use an analogy: As a musician, I’ve seen many a beginner buy a very expensive instruments from square-one [I liken this to having access to all of the answers aka “info-dumping”]. Although you can say that “you can’t blame the instrument anymore and it’s now up to hard work”, so many times, the ease of getting a thing overshadows creating a thing which requires a shift of thinking from a consumer to a maker. The same can be true of information- knowing is an abstraction and by “info-dump”, it doesn’t equate understanding and I think a large part of understanding comes from the physical activity of receiving the information when you can value/need it/understand the context. I’m sure I have succumbed to these strong temptations in my life many times- maybe I’m doing it right now…
However, I feel confident in this recipe for succeeding in anything:
“Do a lot of work consistently with persistence, awareness, curiosity, and purpose.” Or, in distilled terminology:
Enough of my soapbox…
Check this out:
On apprenticeships: “In the old days that sometimes meant just hanging around sweeping the floor or helping stack wood, being a ready eager extra hand. When the carpenter was satisfied with the young students’ commitment, then he would begin to give some unimportant tasks to accomplish. Rudimentary tools and basic instruction of their use would be provided. As experience and familiarity with the tools was gained, he was allowed to approach more involved work. Generally the methods of teaching are not overt. It is said that the student must “steal” information. That is, when he has tried and failed at something, then truly ready and eager to learn, the teacher will allow an opportunity for the student to see how it should be done. But nothing is said and the student can’t just stand and watch. He must sneak a look while still busy with his designated task of the moment. Little or no pay was received until the apprentice could produce useful work.” –Takumi Carpentry
Based on what I’ve experienced- and the system that was developed over centuries, what I would add as a teacher to my academic courses are:
To point out what students do and let them explain to the class how they got there frequently and well BEFORE a critique
To let them fail without me feeling personally responsible
To use silence and work as a way to reduce abstraction
To work in front of students as much as possible in and out of class
To make another printing bench so that those who show interest can work alongside me
Can you think of any other ways of “keeping things real” as they say?
NEXT: Over the next chapters I’ll discuss what I learned while in Japan about the preparation of some materials.


